Introduction
Windows Autopilot has been available for years now, but the number of organizations actually using it well is smaller than you'd expect. Most IT teams know the name. Many have read the docs. A surprising number have tried it once, hit a wall during the Out-of-Box Experience, and quietly gone back to imaging. That's a shame, because for the right environment — and cloud-only is often that environment — Autopilot can eliminate hours of per-device setup work and give you a consistent, policy-driven enrollment from the moment a user opens the laptop lid.
This guide walks through setting up Windows Autopilot in its simplest and most common configuration: user-driven mode with Microsoft Entra join (what used to be called Azure AD join). No hybrid domain controllers, no VPN tunnels during OOBE, no Configuration Manager co-management. Just Intune, Entra ID, and a device that can reach the internet. If that sounds like it matches your situation, this is the guide that will actually get you to a working deployment.
We'll go step by step through the Intune portal, explain what each setting controls and why, and cover the things that tend to go wrong. I've structured this around the real decision points — not just "click here, then click there," but why a particular setting matters and what happens downstream if you get it wrong.
What "Cloud-Only" Actually Means
Before touching anything in the Intune portal, it's worth being precise about what "cloud-only" means in the context of Autopilot, because the terminology trips up even experienced admins.
When a Windows device joins your organization, it can do so in one of three ways. Microsoft Entra registered (formerly Azure AD registered) is the lightest touch — the device is known to your tenant but the user signs in with a local or personal account. It's common for BYOD scenarios and gives you limited management capability. Microsoft Entra joined (formerly Azure AD joined) is a full organizational join — the device's primary identity is your Entra tenant, users sign in with their organizational account, and you get full Intune management. Microsoft Entra hybrid joined is the third path: the device is joined to both your on-premises Active Directory and Entra ID, which gives you the cloud management layer while maintaining that traditional domain trust.
When this guide says "cloud-only," we mean Microsoft Entra joined — no hybrid. The device has no relationship with an on-premises domain controller. It doesn't need line of sight to a DC during setup. It doesn't need a VPN. It authenticates entirely through Entra ID and is managed entirely through Intune. This is the cleanest Autopilot configuration because it removes the most variables. There's no sync timing to worry about between AD and Entra. There's no Intune Connector for Active Directory to install and maintain. The device just needs internet access and a user with valid credentials.
The hybrid path exists for good reasons — organizations with deep on-prem dependencies, legacy applications that need Kerberos tickets from a domain controller, file shares with NTLM authentication, Group Policy that hasn't been migrated yet. But if you're standing up a new environment, or your workforce is distributed and your apps are mostly SaaS and Microsoft 365, cloud-only is almost certainly where you should start. You can always layer in hybrid join later if specific workloads demand it. Going the other direction — peeling away a hybrid configuration to move cloud-only — is significantly more painful.
When Cloud-Only Autopilot Is a Good Fit
Cloud-only Autopilot works best when the organization's identity and application landscape is already centered on Microsoft 365 and Entra ID. Think small-to-mid-sized companies that stood up their IT on Microsoft 365 from day one, or larger organizations that have already migrated their workloads to the cloud and no longer depend on on-premises Active Directory for day-to-day authentication. Remote-first teams are natural candidates — if your users are spread across home offices and coworking spaces, requiring line-of-sight to a domain controller during device setup is a logistics headache you don't need.
It's also the right fit when you're deploying new hardware at scale and want a zero-touch or near-zero-touch experience. The classic scenario: you order 50 laptops from Dell or Lenovo, the OEM registers the hardware hashes with your Autopilot service at the factory, and the devices ship directly to users' homes. The user opens the box, connects to Wi-Fi, signs in with their org credentials, and Autopilot takes over — applying your deployment profile, enrolling the device in Intune, installing apps, enforcing policies. No one in IT touches the device.
Where it falls apart is when legacy dependencies are still in play. If your line-of-business application requires a domain-joined machine to authenticate (actual Kerberos auth against AD, not SSO through Entra), Autopilot cloud-only won't give you that. Network file shares that rely on NTLM are another friction point. Printers managed through Group Policy print servers. Old on-prem databases with Windows Integrated Auth. These are real blockers, and pretending otherwise will cost you time. The correct move in those situations is either to solve the dependency first (migrate the app, move the shares to SharePoint or Azure Files with Entra Kerberos) or use hybrid join as a bridge while you work on the migration.
One more scenario worth flagging: organizations that have existing on-prem AD and hundreds of devices already hybrid-joined. You don't need to convert everything at once. A practical approach is to Autopilot-enroll new devices as cloud-only while leaving existing devices in their current state. Over time, as hardware refreshes happen, your fleet naturally shifts toward cloud-only. Trying to rip-and-replace an entire hybrid environment over a weekend is a recipe for support tickets.
Prerequisites and Licensing
Autopilot has a few hard requirements that are worth confirming before you start configuring anything, because discovering a licensing gap halfway through a pilot is demoralizing for everyone involved.
Licensing
You need Microsoft Intune — specifically the Intune device management license. This is included in Microsoft 365 E3, E5, Business Premium, and the standalone Intune Plan 1. If your organization is on Microsoft 365 Business Basic or Standard, you don't have Intune, and Autopilot won't work. You also need Entra ID P1 (or P2) for dynamic group membership, which is how you'll target deployment profiles to the right devices. Entra ID P1 is included in M365 E3 and Business Premium. If you're on a license plan that includes Intune but not Entra P1, you can add Entra P1 as a standalone add-on, but check this before you start building dynamic groups and wonder why they never populate.
Windows editions
The device must be running Windows 10 or Windows 11 Pro, Enterprise, or Education. Windows Home does not support Autopilot. This seems obvious, but I've seen it bite teams that ordered consumer-grade hardware assuming they'd upgrade the edition later — and then discovered that the hardware hash was already registered against the Home SKU, which created confusion during enrollment. If you're procuring devices, specify Pro or Enterprise in the purchase order.
Internet connectivity
During the Out-of-Box Experience, the device needs to reach Microsoft's Autopilot services, Entra ID, and Intune. This means the device needs a working internet connection before the user signs in. In a corporate office on wired Ethernet, that's trivial. For a remote user on home Wi-Fi, the device presents the network connection screen during OOBE, and the user connects manually. If your organization uses a captive portal for guest Wi-Fi (hotels, coworking spaces), that can interfere with OOBE networking. Something to note in your user-facing documentation.
Hardware hash registration
Every device that will use Autopilot needs its hardware hash registered with your tenant. There are three ways to get it there: the OEM registers it at the factory (best for new purchases), you extract it using a PowerShell script and upload a CSV (best for existing devices), or a reseller/partner handles it through the Partner Center. We'll cover this in Step 2.
Teams sometimes assume that any device with a Windows Pro license will automatically participate in Autopilot once they configure profiles. That's not how it works. Autopilot is identity-driven at the hardware level — the device's hardware hash must be registered with your tenant first. Without that registration, the device will go through a normal OOBE with no awareness that Autopilot exists.
Microsoft Store for Business
Microsoft has been retiring the Microsoft Store for Business in phases. It was previously listed as a prerequisite for certain Autopilot app deployment scenarios. As of 2026, you should not be building any new dependencies on it. Use Intune's native app deployment (Win32 apps, Microsoft Store apps via the new Intune integration, or line-of-business app packages) instead. If you see older documentation referencing Store for Business in the context of Autopilot, ignore it.
Step 1: Verify Automatic MDM Enrollment
Configure MDM auto-enrollment in Entra ID
This is the step that makes everything else work, and it's the one most commonly skipped by teams setting up Autopilot for the first time. When a device joins Entra ID, automatic MDM enrollment is what triggers the handoff to Intune. Without it, you'll get a device that's Entra-joined but not Intune-managed — which means none of your compliance policies, configuration profiles, or app deployments will apply. The device looks like it enrolled successfully from the user's perspective, but Intune has no idea it exists.
Navigate to Devices > Enrollment > Windows in the Intune admin center. This is the central page for all Windows enrollment configuration — you'll come back here repeatedly during Autopilot setup. The top section lists enrollment options (Automatic Enrollment, restrictions, Windows Hello), and further down you'll find the Windows Autopilot section with Devices, Deployment profiles, and the Enrollment Status Page.
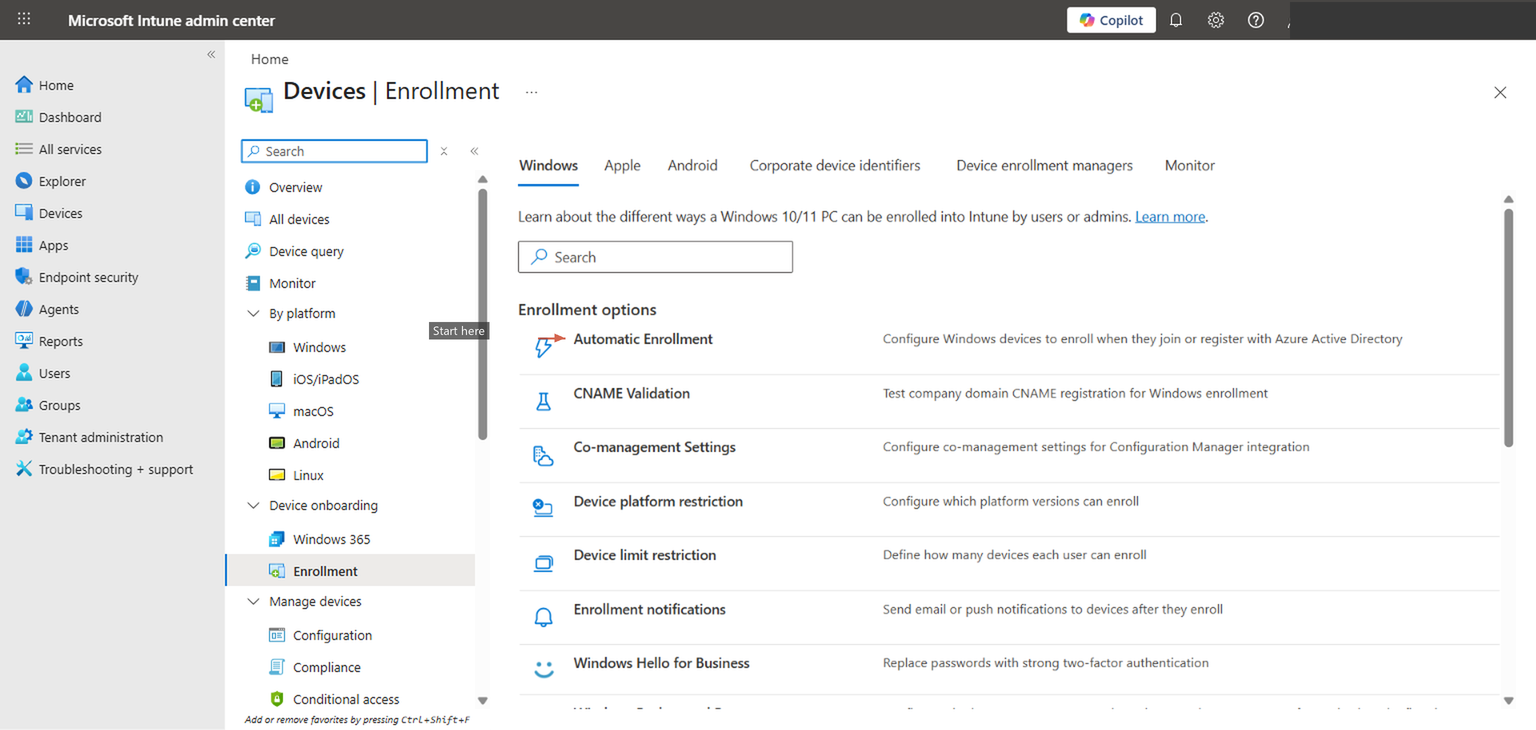
Click Automatic Enrollment to open the MDM and MAM scope configuration.
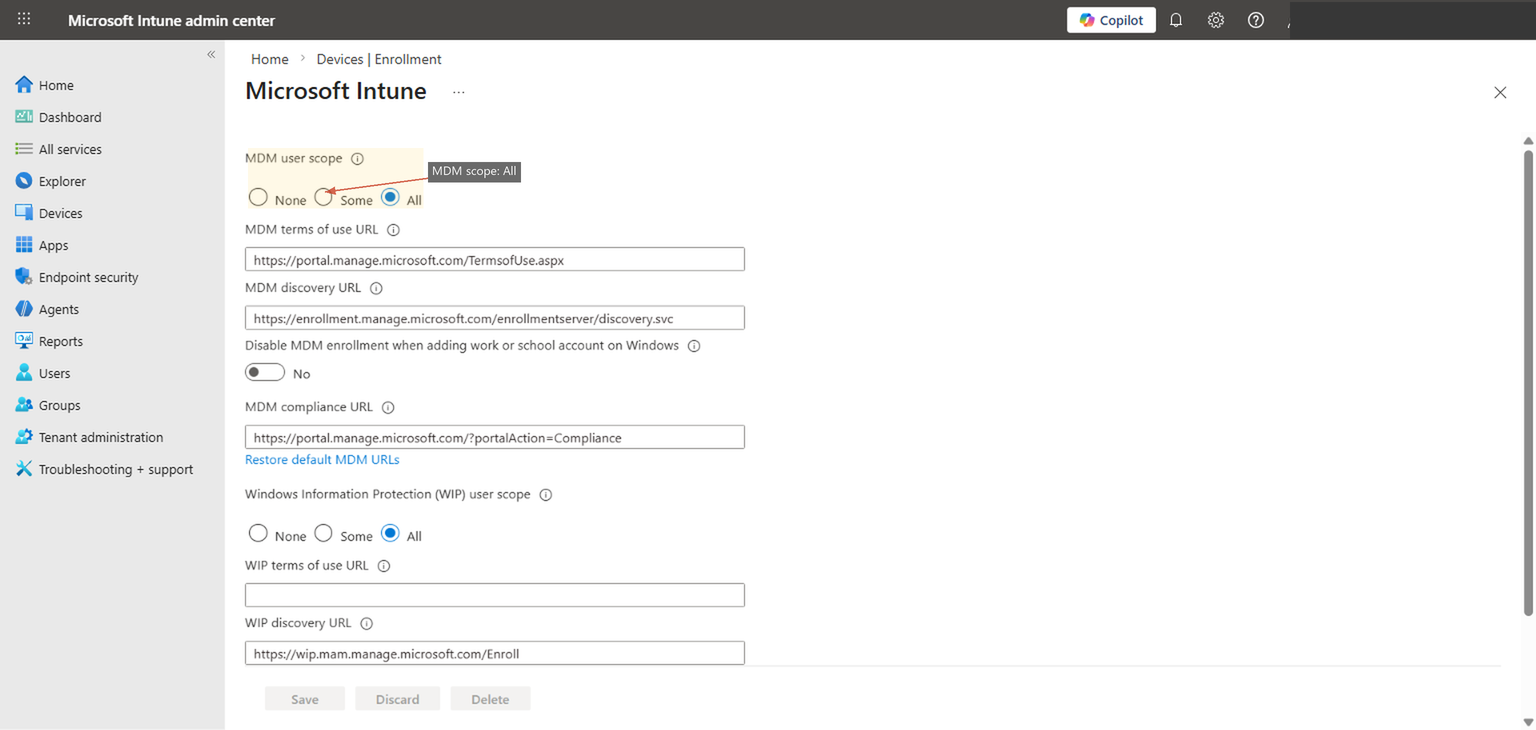
Set MDM user scope to either "All" or a specific Entra security group. "All" is appropriate for most organizations that want every Entra-joined device managed by Intune. If you want to limit enrollment to a specific set of users (common during pilot phases), create a security group, add your pilot users, and select that group instead. The MDM discovery URLs should already be populated — https://enrollment.manage.microsoft.com/enrollmentserver/discovery.svc is the standard endpoint. Don't change these unless you have a specific reason to.
The MAM user scope controls mobile application management without full device enrollment. For the purposes of Autopilot on Windows devices, MAM scope is irrelevant — you're doing full MDM enrollment. Some guides recommend setting both to "All" for simplicity, but MAM scope on Windows is a different conversation and doesn't affect Autopilot behavior.
After configuring this, don't just move on. Open a private browser, sign into the Entra admin center (entra.microsoft.com), navigate to Devices > All devices, and confirm you can see the enrollment settings reflected. If you've scoped to a security group, verify the group membership includes your pilot users. A misconfigured scope is the single most common reason Autopilot appears to "work" during OOBE but produces a device that isn't actually managed.
Step 2: Register Devices with Autopilot
Get hardware hashes into your tenant
Every Windows device has a hardware hash — a unique identifier derived from the device's hardware components (motherboard, TPM, network adapter, disk, and other attributes). This hash is what ties a specific physical device to your Autopilot service. Without it, Autopilot has no way to recognize the device during OOBE, and the user will see a standard Windows setup experience instead of your customized deployment flow.
There are three ways to register hardware hashes, and which one you use depends on your situation.
Method 1: OEM pre-registration (recommended for new hardware)
If you're purchasing devices from Dell, HP, Lenovo, Microsoft Surface, or other major OEMs, the manufacturer can register hardware hashes directly with your Autopilot service before the devices ship. You provide the OEM with your Entra tenant ID, and they handle the registration at the factory. This is the cleanest path because the devices arrive ready for Autopilot — no manual steps, no scripts, no CSV files. Dell calls this "Dell Provisioning for Windows Autopilot," HP has "HP Registration for Windows Autopilot," and Lenovo offers it through their portal as well. If you're ordering 50+ devices, ask your reseller about this. It's usually free or near-free, and it saves your team from touching every device.
Method 2: PowerShell extraction (for existing devices)
For devices you already own, the Get-WindowsAutopilotInfo PowerShell script extracts the hardware hash and either outputs it to a CSV or uploads it directly to your tenant. On a device running Windows 10 or 11:
Install-Script -Name Get-WindowsAutopilotInfo
Get-WindowsAutopilotInfo -OutputFile C:\autopilot-hash.csv
This generates a CSV with the device serial number, hardware hash, and Windows product ID. You then upload that CSV in the Intune admin center under Devices > Enrollment > Windows > Windows Autopilot > Devices > Import. The script also supports a -Online parameter that registers directly to your tenant without the CSV intermediate step, but that requires a Graph API connection and appropriate permissions.
For existing devices you plan to Autopilot-enroll, remember that you'll typically need to reset them. A device that's already set up and in use won't go through OOBE again unless you wipe it. The hardware hash registration is a prerequisite — the actual Autopilot experience happens during the next OOBE.
Method 3: Reseller or partner registration
Microsoft partners and authorized resellers can register hardware hashes on your behalf through the Partner Center. This is useful if you're working with a managed services provider or VAR who handles procurement. They'll need delegated admin permissions or your tenant ID to complete the registration.
After importing hardware hashes, it can take up to 15 minutes for devices to appear in the Autopilot devices list, and occasionally longer during peak hours. Don't panic if the import shows "complete" but the device isn't visible yet. Refresh the list after a few minutes. If it still doesn't appear after 30 minutes, check that the CSV format is correct — the most common issue is a malformed hardware hash or a missing column header.
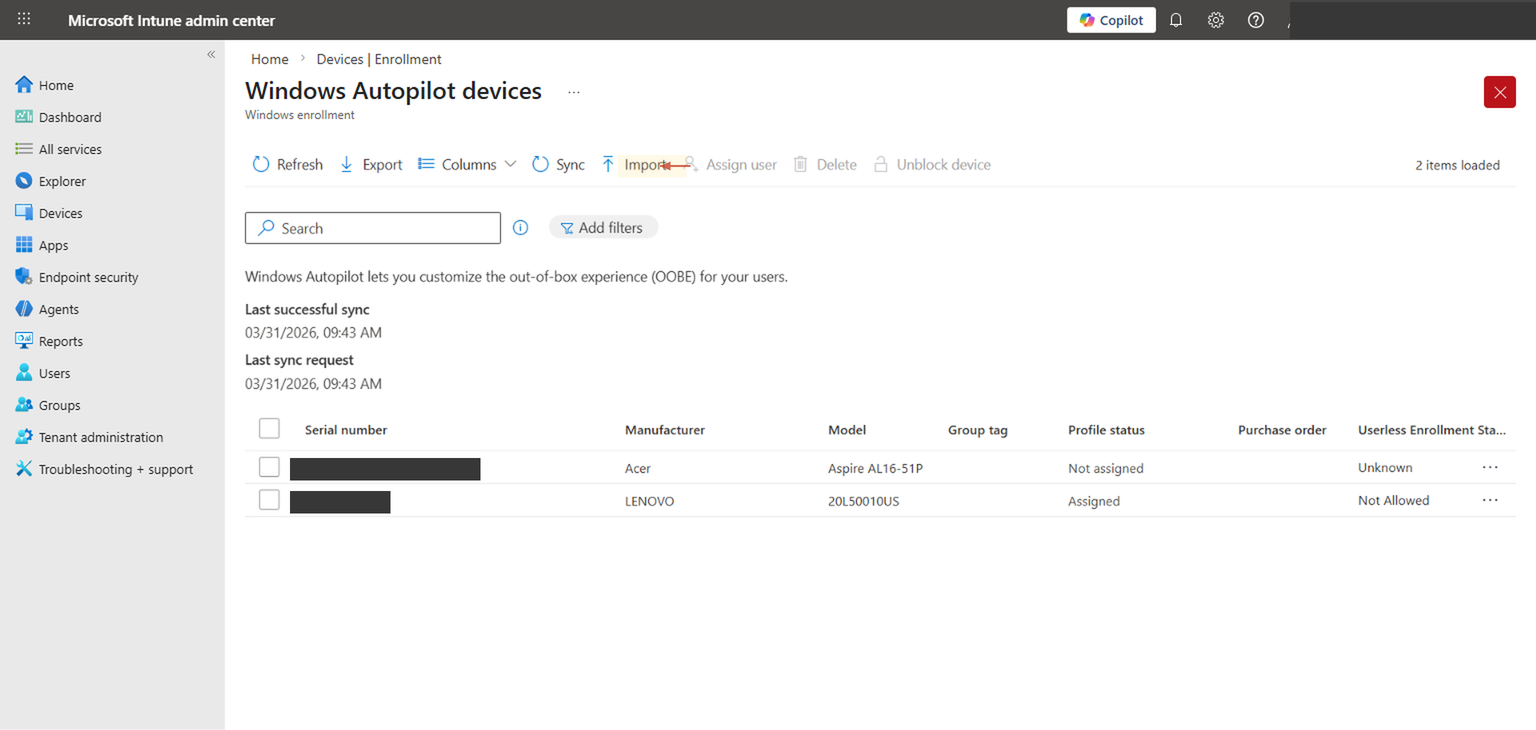
Once devices are registered, you can see them under Devices > Enrollment > Windows > Windows Autopilot > Devices. This view shows each device's serial number, manufacturer, model, and profile assignment status. The "Profile status" column is the one to watch — devices showing "Assigned" have a deployment profile targeted to them and are ready for Autopilot enrollment. Devices showing "Not assigned" are registered but don't yet have a profile — you'll fix that in Step 5 when you assign the profile to a device group.
Step 3: Create a Deployment Profile
Define the OOBE experience for your devices
The deployment profile is where you control what the user sees — and doesn't see — during the Out-of-Box Experience. This is the central configuration for Autopilot, and it's where cloud-only and hybrid paths diverge. Getting this right means users have a smooth, branded enrollment experience. Getting it wrong usually means confused users, support calls, and devices that end up in the wrong state.
Navigate to Devices > Enrollment > Windows > Windows Autopilot > Deployment profiles. If you've already created a profile, you'll see it listed here with its join type and assignment status.
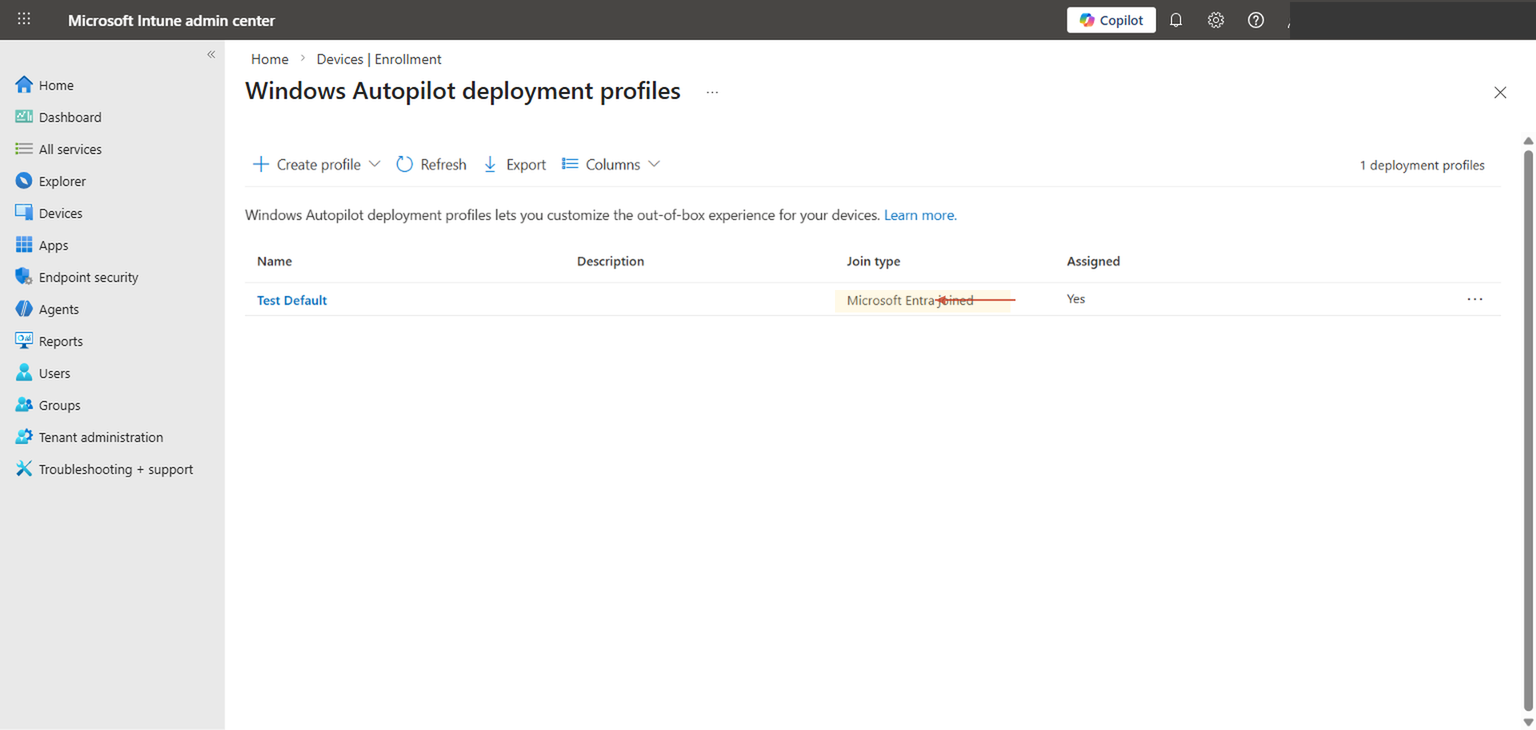
Click + Create profile > Windows PC to start a new profile. The wizard walks through Basics, Out-of-Box Experience (OOBE), Scope Tags, and Assignments.
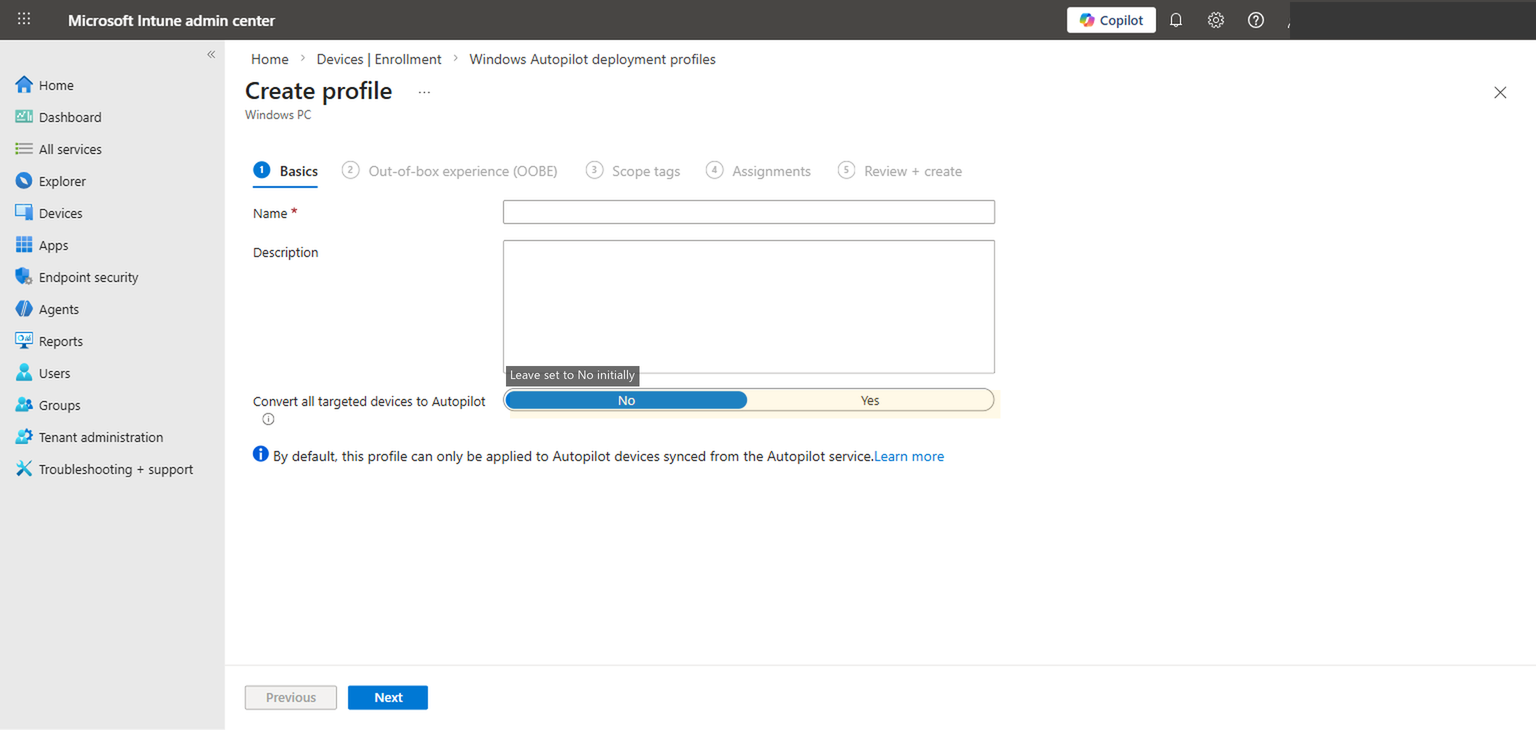
On the Basics tab, give the profile a descriptive name. Something like "Cloud-Only User Driven Standard" is more useful six months from now than "Test Profile 1." The description field is optional but worth filling in — note the intended audience, who created it, and when. The "Convert all targeted devices to Autopilot" toggle registers non-Autopilot devices automatically when they receive this profile; leave it set to No for your initial setup. You can enable it later if you decide to convert existing Intune-managed devices to Autopilot without re-registering their hardware hashes manually.
The OOBE settings tab is where the real decisions live.
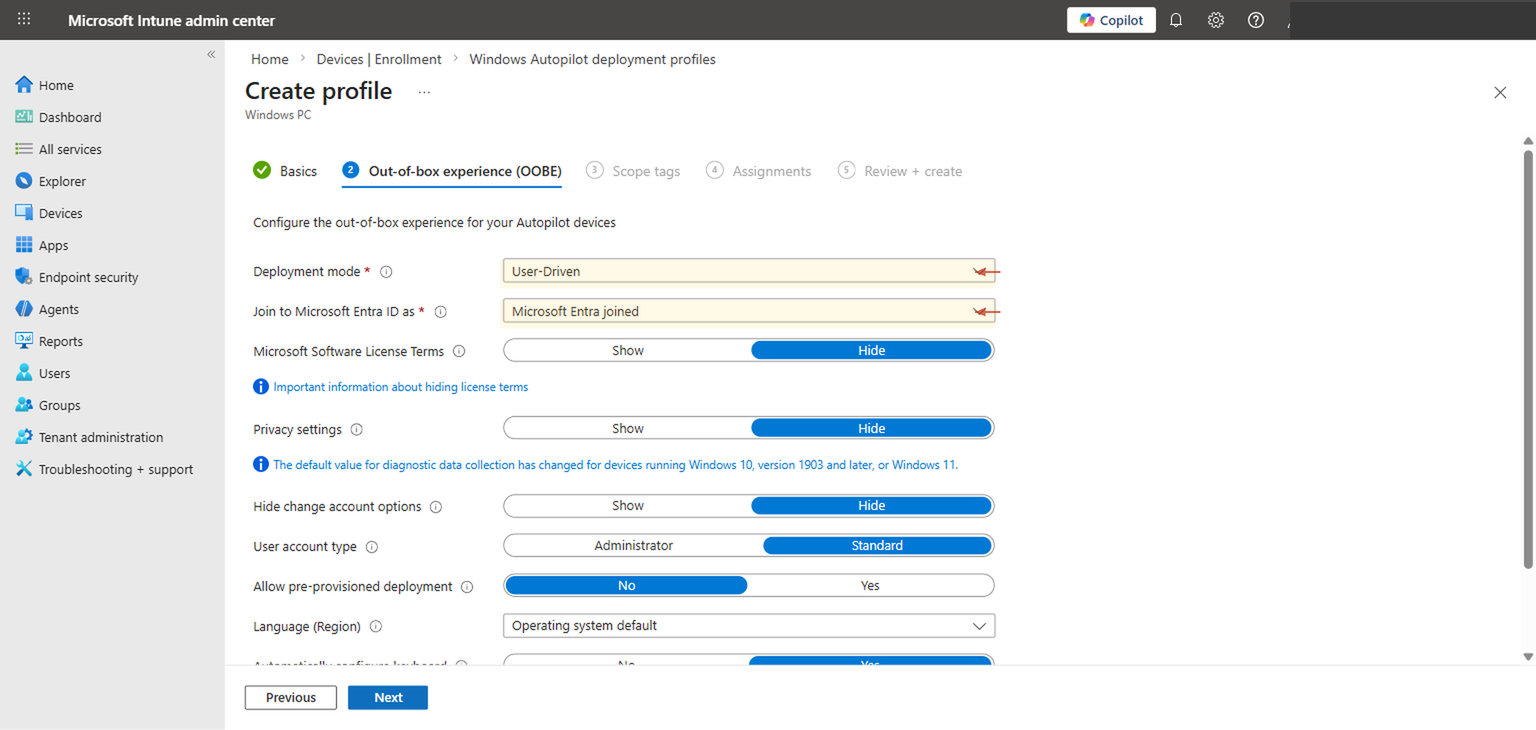
Let's walk through each setting and what it actually controls.
Deployment mode: User-Driven. This means a user sits in front of the device during OOBE and authenticates with their organizational credentials. Autopilot uses that sign-in to associate the device with the user in Entra ID and Intune. The alternative — self-deploying mode — is for shared devices and kiosks where no user signs in. For most organizations deploying laptops to named individuals, user-driven is what you want.
Join to Microsoft Entra ID as: Microsoft Entra joined. This is the cloud-only setting. The device will join only Entra ID — no on-premises AD involvement. If you selected "Microsoft Entra hybrid joined" here, you'd need the Intune Connector for Active Directory installed on-prem and line-of-sight to a domain controller. For cloud-only, leave this as Microsoft Entra joined.
Microsoft Software License Terms: Hide. This suppresses the Windows EULA screen. Your users have already accepted these terms through your organization's volume licensing agreement. Showing it during OOBE adds friction without any legal benefit.
Privacy settings: Hide. This skips the Windows privacy screen (location services, diagnostic data, inking, etc.). You should be managing these settings through Intune configuration profiles anyway, where you can enforce specific privacy settings consistently across your fleet rather than relying on whatever the user clicks during setup.
Hide change account options: Hide. This prevents the user from switching to a different account during OOBE. Without this, a user could theoretically sign in with a personal Microsoft account or a different organizational account, which would join the device to the wrong tenant. Hide it.
User account type: Standard. This is a security decision. When set to Standard, the user who enrolls the device gets a standard (non-admin) local account. When set to Administrator, they get local admin rights. The security best practice is Standard. If users need occasional elevation, handle it through a privileged access management solution, Intune's Endpoint Privilege Management (if licensed), or a dedicated local admin account managed through LAPS. Defaulting every user to Administrator is a security gap that will haunt you during your next audit.
Setting user account type to Standard is straightforward in principle but requires preparation. Before you flip this to Standard across your fleet, make sure your Intune policies handle software installation, driver updates, and any other tasks that currently require admin rights. If users are accustomed to installing their own software, you'll need either a self-service app catalog in Company Portal or a clear process for requesting software through IT. Changing this setting without that support structure in place generates a wave of "I can't install anything" tickets.
Allow pre-provisioned deployment: No. Pre-provisioning (formerly called "white glove") lets IT complete part of the Autopilot process before the device reaches the user — installing apps and applying policies in advance so the user's OOBE is faster. It's a great feature for organizations with a staging area or IT depot, but it adds complexity. For your initial cloud-only setup, leave this at No. You can enable it later once the basic flow is proven.
Language (Region): Operating system default. The device will use whatever language the Windows installation media was built with, typically matching the region it was purchased in. If you have a multilingual workforce and need to control this, you can set a specific language here, but for most deployments the OS default is fine.
Automatically configure keyboard: Yes. This sets the keyboard layout to match the selected region, which avoids the keyboard selection screen during OOBE. One less screen the user has to click through.
Apply device name template: No (but consider it). The device name template lets you enforce a naming convention — for example, CN-%SERIAL% would name devices with a "CN-" prefix followed by their serial number. If you don't set a template, the device gets a random name like DESKTOP-A1B2C3D. For a fleet of 5 devices, random names are fine. For 500 devices, a naming convention makes your Intune portal, your Entra device list, and your support team's life meaningfully easier.
Establish a naming template early, even if your fleet is small today. Renaming devices after enrollment is possible but requires a sync cycle and a reboot, and some naming patterns based on %SERIAL% or %RAND:x% only work during Autopilot provisioning. A pattern like CN-%SERIAL% gives you identifiable, unique names without any ongoing maintenance. Keep the total length under 15 characters to avoid NetBIOS truncation issues.
Step 4: Configure the Enrollment Status Page
Control what users see during provisioning
The Enrollment Status Page (ESP) is the screen that appears after the user signs in during OOBE, while Intune is applying policies, installing apps, and configuring the device. Without an ESP, the user lands on the desktop immediately after authentication, and policies and apps trickle in over the next several minutes (or hours, depending on what you're deploying). The user might try to use the device before critical software is installed or security policies are enforced. The ESP solves this by blocking access to the desktop until a defined set of provisioning steps are complete.
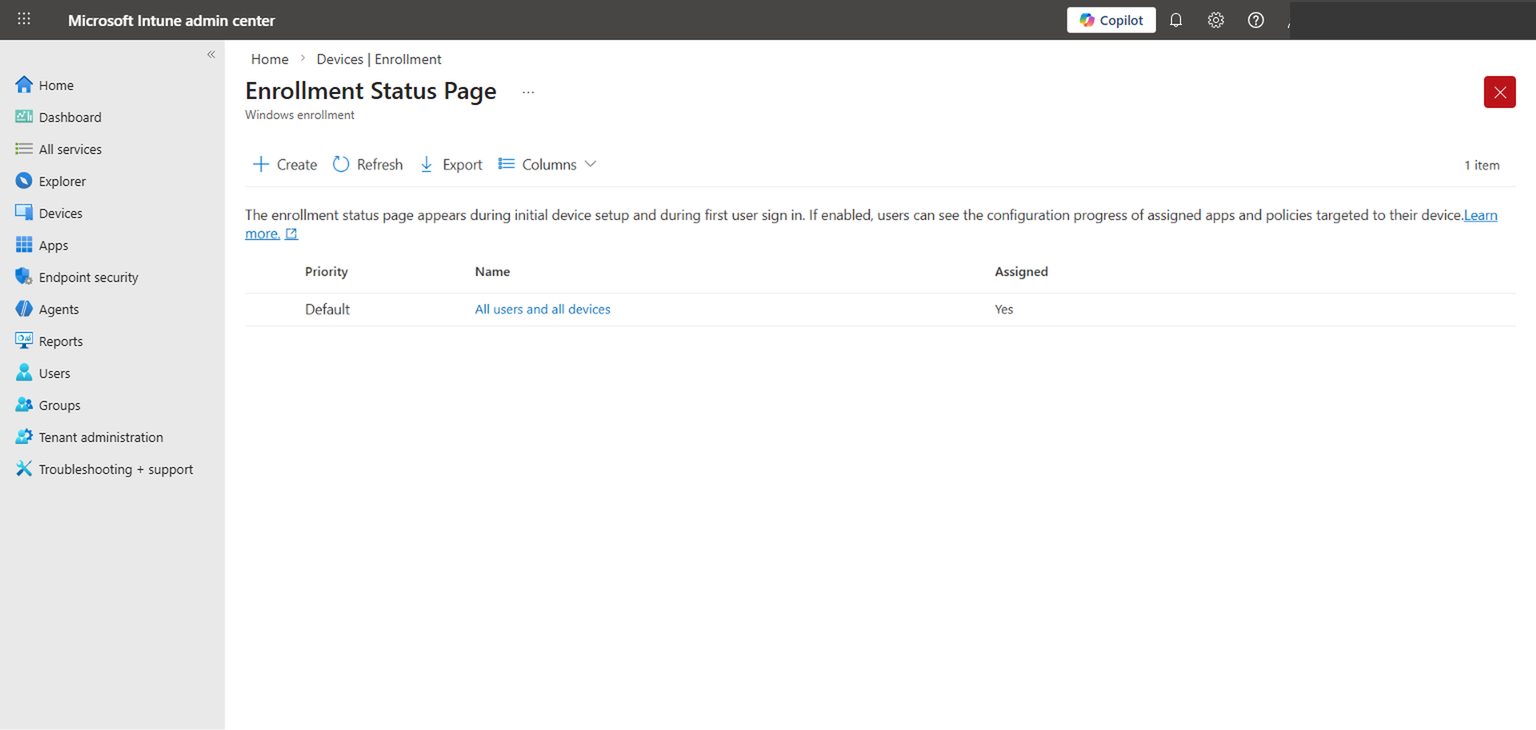
Navigate to Devices > Enrollment > Windows > Enrollment Status Page. You'll see a default profile that applies to all users and all devices. You can edit this default or create custom ESP profiles targeted to specific groups.
The key settings in an ESP profile are:
Show app and profile configuration progress: Yes. This is what makes the ESP visible. When set to Yes, users see a progress screen showing device preparation, device setup, and account setup phases. When set to No, the ESP is effectively disabled and users go straight to the desktop.
Show an error when installation takes longer than specified (minutes): The timeout. Setting this to 60 minutes is reasonable for most deployments. If your required apps include large packages (Office 365 apps, for instance, can take 20-30 minutes on a slow connection), give yourself headroom. Setting it too low means devices will error out during enrollment even though everything was going to succeed if given another few minutes.
Block device use until all apps and profiles are installed: This is the enforcement toggle. When enabled, the user cannot dismiss the ESP or access the desktop until all required apps and policies have been applied. When disabled, the user can click "Continue anyway" and reach the desktop before provisioning is complete. For security-critical deployments — where you need BitLocker enabled, Defender configured, and compliance policies applied before the user touches anything — enable this. For less sensitive environments, allowing the user to proceed can reduce frustration during initial setup.
Allow users to reset device if installation error occurs: If provisioning fails, this gives the user a "Reset" button to wipe and retry. Useful for remote users who can't easily bring the device to IT, but be aware that it initiates a full device reset. For pilot deployments, enabling this is practical — it lets testers self-recover without IT intervention.
For your initial rollout, keep the ESP simple. Enable it, set a 60-minute timeout, and mark only your truly critical apps as "required" during ESP (you configure this per-app in Intune's app assignment settings). Don't block on 15 different apps the first time — start with your core agent (if you have one), Office apps, and your security baseline. You can tighten the ESP requirements incrementally as you gain confidence in provisioning times. An ESP that blocks for 45 minutes because it's waiting on a non-essential app will frustrate users and undermine confidence in the whole Autopilot process.
Step 5: Assign the Profile to a Device Group
Target the right devices with the right profile
Your deployment profile needs to be assigned to a group that contains the devices you want to enroll through Autopilot. This is where dynamic device groups in Entra ID become essential.
The most reliable approach is a dynamic device group that targets Autopilot-registered devices. In the Entra admin center or Intune, create a new security group with dynamic device membership and use this rule:
(device.devicePhysicalIDs -any (_ -startsWith "[ZTDId]"))This rule matches any device that has a Zero Touch Device ID — in other words, any device whose hardware hash has been registered with Autopilot. As you import hardware hashes (Step 2), devices automatically appear in this group without manual intervention. That's the value of dynamic groups: they stay current as your fleet changes.
You might be tempted to assign the deployment profile to "All Devices" and call it done. Resist that impulse, especially during initial rollout. "All Devices" includes every Intune-managed device in your tenant — existing laptops, mobile devices, shared kiosks, everything. If you later create a second deployment profile for a different scenario (self-deploying mode for conference room devices, or a different OOBE configuration for a specific department), you'll have conflicting profile assignments. Starting with a targeted group keeps your deployment clean and gives you a clear scope for testing.
For a pilot, you can also create a static group and manually add specific devices. This gives you complete control over which devices receive the Autopilot profile during testing. Once you're confident the configuration is correct, switch to the dynamic group for production.
After assigning the profile, there's a sync interval to be aware of. Intune evaluates profile assignments periodically, and it can take up to 30 minutes for a newly assigned profile to be recognized. If you're testing immediately after assignment and the device goes through OOBE without the Autopilot experience, wait for the sync to complete and reset the device again.
After creating the group and assigning the profile, navigate to Devices > Windows > Windows Autopilot > Devices, find your test device, and check its profile status. It should show the profile name in the "Deployment profile" column. If it shows "Not assigned," check that the device is a member of the group you targeted and that the group membership has had time to evaluate. Dynamic group evaluation can take 5-15 minutes after initial creation.
Step 6: Test with a Pilot Device
Validate the full OOBE experience end to end
With the profile assigned, it's time to test. Take a device whose hardware hash is registered and whose deployment profile shows as assigned in the Autopilot devices list. If the device has already been set up, reset it: Settings > System > Recovery > Reset this PC > Remove everything. For a truly clean test, use "Cloud download" to pull a fresh Windows image, which closely simulates the new-hardware experience. Local reinstall works too, but cloud download eliminates any cached state that might mask issues.
When the device boots to OOBE, here's what you should see:
First, the region and keyboard selection screens — unless you configured the deployment profile to auto-configure these, in which case they're skipped automatically. Then the network connection screen. The user connects to Wi-Fi (or is already on wired Ethernet). After connecting, the device contacts Microsoft's Autopilot service, identifies itself via its hardware hash, and pulls down the deployment profile. This is the moment where Autopilot "takes over" — you'll see a branded sign-in screen with your organization's name.
The user enters their organizational email and password (and completes MFA if configured). After authentication, the Enrollment Status Page appears, showing the three provisioning phases: Device preparation, Device setup, and Account setup. Device preparation joins the device to Entra ID and enrolls it in Intune. Device setup applies device-targeted policies and installs device-targeted apps. Account setup applies user-targeted policies and installs user-targeted apps.
The total time from sign-in to desktop depends heavily on what you're deploying. A minimal configuration with no required ESP apps might complete in 5-10 minutes. A full deployment with Office 365 apps, a VPN client, a security agent, and multiple configuration profiles can take 20-40 minutes, especially on a slow internet connection. For your pilot test, time it. This gives you a baseline to set user expectations and tune your ESP timeout.
What "success" looks like: the user reaches the desktop, all expected apps are in the Start menu or taskbar, the device appears in Intune as compliant (or at least enrolled and checking in), and the device properties show the correct join type (Microsoft Entra joined) and enrollment profile.
If the device goes through a standard Windows OOBE with no Autopilot branding — no organizational sign-in, just the normal "Let's set up your device" flow — it almost always means one of three things: the hardware hash isn't registered, the deployment profile isn't assigned to the device's group, or the profile assignment hasn't synced yet. Don't troubleshoot the device itself. Go back to the Intune portal, verify the hardware hash appears in the Autopilot devices list, verify the profile is assigned, and try again.
What to Verify After Enrollment
Once a device is enrolled and the user is at the desktop, your work isn't done. A device that looks enrolled can still have issues that only surface later — policies that didn't apply, apps that failed to install silently, compliance rules that are evaluating but haven't reported yet.
Start in the Intune admin center. Navigate to Devices > All devices, find the enrolled device, and check these properties:
Join type should show "Microsoft Entra joined." If it shows "Microsoft Entra registered" instead, something went wrong during enrollment — the device registered rather than joined, which means it's not fully managed. This usually points to an MDM auto-enrollment scope issue (Step 1).
Compliance state should be "Compliant" or "Not evaluated" (if you haven't configured compliance policies yet). "Not compliant" immediately after enrollment isn't necessarily a problem — some compliance checks (like requiring a specific Windows version or BitLocker encryption) take time to evaluate and remediate. Give it an hour and check again.
Configuration profile status — click into the device, go to Device configuration, and verify that your expected profiles show "Succeeded." Any profile showing "Error" or "Conflict" needs investigation. Conflicts typically mean two policies are trying to set the same setting to different values.
App installation status — under Managed apps, verify that required apps show "Installed." Apps marked as "Install pending" may just need more time. Apps showing "Failed" need your attention — check the error code and the app's assignment and detection rules.
On the device itself, if you need deeper diagnostics, open Event Viewer and navigate to Applications and Services Logs > Microsoft > Windows > DeviceManagement-Enterprise-Diagnostics-Provider > Admin. This log contains the Intune enrollment and policy application events with specific error codes. For Autopilot-specific events, check ModernDeployment-Diagnostics-Provider > Autopilot.
Confirm: (1) Join type is "Microsoft Entra joined," (2) Intune enrollment status is active, (3) compliance policies are evaluating or compliant, (4) configuration profiles show "Succeeded," (5) required apps are installed, (6) the device name matches your template (if configured), and (7) the user has Standard (not Admin) local privileges if that's your policy. This takes five minutes per device during a pilot and catches issues before they multiply across a fleet.
Common Mistakes
This is the number-one Autopilot setup failure. The device joins Entra ID successfully, the user signs in, the OOBE completes — but the device never enrolls in Intune. No policies, no apps, no compliance. The fix is straightforward (Step 1), but the symptom is confusing because everything looks right from the user's perspective. Always verify MDM user scope before anything else.
Without the hardware hash, Autopilot doesn't recognize the device. The device goes through a vanilla Windows OOBE. The user might even sign in with their org account and get an Entra-joined device — but it won't receive the deployment profile, the OOBE customizations, or the ESP experience. For new hardware, confirm with your OEM or reseller that Autopilot registration is included. For existing devices, run the PowerShell script and import the CSV before resetting the device.
Autopilot deployment profiles must be assigned to device groups, not user groups. This catches people because most Intune policies can be targeted to either. But Autopilot profile assignment happens before any user signs in — the profile is matched to the device during OOBE, based on the hardware hash and device group membership. If you assign the profile to a user group, no device will ever receive it.
The default in the deployment profile wizard is Administrator. It's easy to leave it unchanged and move on. But this gives every enrolled user local admin rights, which means they can install unsigned software, disable security features, modify registry settings, and generally undermine every security policy you've spent time configuring. Change it to Standard and prepare an elevation strategy (LAPS, Endpoint Privilege Management, or a separate admin account) before you deploy.
The Enrollment Status Page can block users from the desktop for 30+ minutes if you've marked too many apps as required during ESP. If one of those apps has a broken installer, the ESP can time out and leave the user with a failed enrollment. Test your ESP configuration on a pilot device, time the provisioning, and be intentional about which apps truly need to be installed before the user touches the device. Most apps can install in the background after the user reaches the desktop.
Troubleshooting Basics
When Autopilot doesn't behave as expected, the issue is almost always in the configuration, not in the device. Resist the urge to troubleshoot at the device level first — start in the Intune portal.
OOBE doesn't show the Autopilot experience
The device boots to a standard Windows setup without organizational branding or the Autopilot sign-in screen. Check three things in order: (1) Is the hardware hash registered and visible in the Autopilot devices list? (2) Is a deployment profile assigned to the device (check the profile status column in the Autopilot devices list)? (3) Has the device been able to reach the Autopilot service — does it have internet connectivity during OOBE? If all three are confirmed, wait for the profile assignment sync (up to 30 minutes) and try again.
Device joins Entra but doesn't enroll in Intune
This is the MDM auto-enrollment issue from Step 1. Verify the MDM user scope includes the signing-in user. Also check that the user has an Intune license assigned — MDM enrollment will fail silently if the user's license doesn't include Intune.
Enrollment Status Page gets stuck or times out
Identify which phase is stalling. Device preparation usually completes quickly — if it's stuck there, the issue is typically network connectivity or Entra join failure. Device setup stalls usually mean a device-targeted policy or app is taking too long or failing. Account setup stalls point to user-targeted apps or policies. In the Intune admin center, navigate to the device and check which apps or profiles are pending or failed. Common culprits: large Win32 app packages on slow connections, apps with broken detection rules that Intune thinks failed even though they installed successfully, and configuration profiles that conflict with each other.
Useful diagnostic tools
On the device, run mdmdiagnosticstool.exe -area Autopilot -cab C:\temp\autopilot-diag.cab from an elevated command prompt. This collects Autopilot-specific logs, event logs, and registry state into a single CAB file you can review or share with Microsoft support. For real-time monitoring during OOBE, you can press Shift+F10 to open a command prompt (if not disabled by policy) and run eventvwr.msc to watch events as they occur. The DeviceManagement-Enterprise-Diagnostics-Provider and ModernDeployment-Diagnostics-Provider logs are where the useful data lives.
Rollout Advice
A controlled rollout is the difference between a successful Autopilot deployment and a chaotic one. Even with thorough testing on a pilot device, production conditions introduce variables — different hardware models, different network conditions, different user behaviors. Phasing your rollout gives you time to catch issues when the blast radius is small.
IT team only
1 week
Friendly department
2 weeks
Hardware refresh
Ongoing
| Phase | Scope | Duration | Validation |
|---|---|---|---|
| Phase 1 — IT pilot | 1-3 devices (IT team) | 1 week | Full OOBE flow, app installation, policy compliance, ESP timing, name template |
| Phase 2 — Department pilot | 10-20 devices (friendly department) | 2 weeks | User feedback on OOBE experience, app availability, performance, support ticket volume |
| Phase 3 — Broad rollout | All new devices + hardware refresh | Ongoing | Monitor enrollment success rate, compliance state, ESP failure rate |
Phase 1 is your proof of concept. Use it to validate every assumption. Time the OOBE. Verify apps install. Confirm the device lands in Intune with the right group memberships and compliance state. Test what happens if the network drops during enrollment. Test what happens if the user enters the wrong password. Test what happens if the ESP times out. Break it on purpose so you know what failure looks like before a real user encounters it.
Phase 2 is your usability test. IT teams are forgiving of rough edges — regular users are not. Pick a department with a cooperative manager and a mix of technical abilities. Give them minimal instructions (the goal is to simulate the unboxing experience, not hand-hold through it). Pay attention to what questions they ask. Those questions tell you what your deployment documentation needs to cover. Common feedback at this stage: "The setup screen sat there for 20 minutes and I didn't know if it was working" (you need clearer ESP messaging or to optimize which apps block ESP), or "I couldn't install [app name]" (you need to add it to Company Portal or the required app list).
Phase 3 is production. By this point, your deployment profile, ESP, and app assignments should be stable. New devices entering the fleet — whether from OEM pre-registration or manual hardware hash import — should be joining the dynamic device group automatically and receiving the correct profile. Your helpdesk should have a runbook for common issues (device doesn't show Autopilot during OOBE, ESP timeout, user can't sign in). Monitor your Intune enrollment success rates and investigate any failures promptly. A 95%+ first-attempt success rate is achievable with a well-configured environment; if you're seeing lower numbers, there's a configuration issue to find.
Communication matters more than most IT teams think. A brief email to the helpdesk explaining what Autopilot is, what the user experience looks like, and what the first-line troubleshooting steps are will prevent confusion and reduce escalations. A one-page document for end users — "When you open your new laptop, here's what to expect" — with three screenshots of the OOBE flow sets the right expectations. Users who know what's coming are dramatically less likely to call support than users who encounter an unfamiliar enrollment screen with no context.
Final Takeaways
Windows Autopilot in a cloud-only configuration is one of the most impactful things you can do for device management efficiency, and the initial setup is genuinely straightforward — six steps, a few settings in the Intune portal, and a pilot test. The complexity isn't in the technology. It's in the preparation: making sure licensing is right, hardware hashes are registered, MDM enrollment is configured, and your app and policy landscape is ready for a Standard (non-admin) user on an Entra-joined device. That preparation is where most of the work lives, and it's work that pays off across every device you enroll from that point forward.
The biggest risk in any Autopilot project isn't a misconfigured setting — it's over-scoping the initial deployment. Start with the basics described here. Get user-driven, cloud-only, Microsoft Entra joined working cleanly on a pilot device. Then layer in additional complexity: pre-provisioned deployments for your IT depot, self-deploying mode for shared devices, device name templates for fleet management, custom ESP profiles for different departments. Each of those additions is a small increment on a proven foundation, rather than a sprawling initial deployment where everything is new and nothing is tested.
If your organization needs help planning an Autopilot deployment, configuring enrollment policies, or building a broader Intune management strategy, Cybernerds can help — we do this work for organizations ranging from 50 seats to several thousand, and the patterns in this guide are the same ones we apply in production.